Modding the Kodak Reels 8mm Film Digitizer (Firmware Hack)

JSYBen

New Tinkerer
Jul 6, 2025
2
2
3
Received my Reels today, have been excited to give it a try with the customisations! My Serial Number is C1725148BK00706, which Steve's Kodak 8mm Digitizer Firmware Lookup Tool didn't seem to recognise, though it suggested using Firmware B. I tried 0dan0's latest 6.5 firmware for Firmware B, and the machine hung when starting up. Version C seemed to work though, so have been using that. The only issue I came across, is that the machine presumed it was recording with no issue, but then when putting the SD Card into the computer, the card was empty, no space even used up on the card. This was after formatting the card on the machine itself. The machine itself seems to format cards as ExFAT. Formatting the card manually in FAT32 on my Mac seemed to sort this, though I also did try formatting the card as ExFAT manually on my Mac, just to see if it was the Reels not formatting correctly, but that also didn't record, so not sure why, but in any case, FAT32 was fine for my purposes.

Here is my first recording, straight from the recorder, so no 4K on YouTube for now... :)


Only change on the machine itself was putting the sharpness to -1.0. I'm really happy with the results. I see film grain and not compression artifacts (obviously YouTube is butchering this for now), and this is down to the great work of 0dan0 and others, so many thanks for your work on this. I must admit I'm not a colour expert, so I can't tell if the colours are right here, but they look good enough to me, and I really appreciate the custom firmware not trying to auto correct the white balance every few seconds.


So with 0dan0's firmware, the files are encoded at 18fps. The 8mm I scanned was obviously recorded originally at 16fps. I've seen people use video editors to artificially slow down the footage to 16fps and export, but this doesn't seem to me to be the best way to do it. Not least because to do it you are reencoding the file. FFMPEG can just repackage the file so it plays back at 16fps. If you're not a command line type person, there are great GUI Tools like https://www.shutterencoder.com/ that you can drag the file into, adjust the frame rate, and re-export it without re-encoding the file. It's pretty much an instant export too, no matter how long the file is.
 
Last edited:
  • Like
Reactions: ThePhage and 0dan0

matead

New Tinkerer
Jul 8, 2025
2
1
3
I have a Rev "C" unit. I took a pic of the board/chip and made some voltage measurements for you. Hopefully it will help you find the chip or a compatible one to repair your scanner.
You absolute legend!

The chip is in fact a LSP5523-R8A. The ones Kodak have used are fake clones of the genuine chip (or possibly genuine but with custom part numbers done by Kodak as an expense but I don't believe that's the case because under the fake chip the power plane is missing whilst the genuine chip I replaced it with does have it).

Anyway, I have installed the LSP5523 and I set my bench power supply to 12V 10mA and pressed the power button on the Kodak unit. The voltage dropped meaning it was trying to fire up. So I then increased the current to 100mA and the screen powered up. When the steppers did their 'seek' test, the unit browned out so I gave it the full 1,000mA and it booted to the main menu.

I have since got a proper 12V 2.5A wall adapter on the unit and it's currently scanning some film. Once I have made scans of them, I'll play around with the firmware hacks here and re-scan the films I have again to get the best quality scans that I can.

Thank you so much for your help, and I hope this information will help others in the future should their power boards also fail with the same issue.
 
Last edited:
  • Like
Reactions: fishgee

Mac84

Administrator
Staff member
Founder
Sep 4, 2021
252
311
63
New Jersey, USA
www.mac84.net
Would you please be able to provide the exact product code for the lens you ordered? I know you may have mentioned it earlier, but I'd like to order one myself and would love to grab the right one. (The site has a lot of 12mm lenses listed 😅)

Do I need any specific ribbon cable adapters, or will it use the existing cable?

Thank you again for all your efforts, I'm excited to try a new lens out!
 

0dan0

Tinkerer
Jan 13, 2025
134
200
43
@Mac84 This is the lens I used: https://shop.scorpion.vision/products/m12-lens-12mm-f2-10
Other 12mm macro-lenses might work, but this lens was the only one to have a 28mm near-focus example.

You should use a locking ring, to help with focus: https://shop.scorpion.vision/collections/optical-accessories/products/m12-locking-ring

In my first set up I used a 5mm extension ring from Scorpion, but 7mm extension is easier to implement (fewer modifications to the scanner.)
I used https://www.m12lenses.com/7mm-Metal-Extension-Ring-for-M12-Mount-p/pt-erm12-700m.htm

The ribbon cable is not changed, only the case behind the cable needs more space. I clearly have not found a tool to do this neatly. You do not have to open the unit, just the sensor cover is removed (and stays off.) Add a piece of black masking tape to the back to the sensor board (see pic) as there is some light that leaks through the PCB.
1752684552533.png


If you are interested, I have a spare complete set of the above. I was modifying two additional units (A & B), but purchased three lenses. I could also 3D print another standoff, as shown here https://tinkerdifferent.com/threads...gitizer-firmware-hack.2897/page-24#post-38520
 
  • Like
Reactions: Mac84 and Brionco

KODIAK

New Tinkerer
Jul 20, 2025
3
4
3
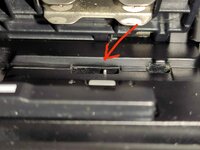
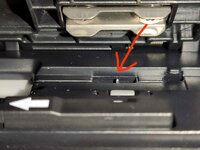
Hello, I own a Kodak reels too. I purchased it to scan some 8mm family movies from the sixties. This machine looks well built but it tends to flip and lift the film especially normal 8mm. I discovered that the rest position of the metal teeth that drives the film is different from others. Mine stops at the full right just after starting lowering, others instead stop after some backward movement to the left and full lowering. Do you know if a different rest position is bad for correct functioning? I compared two identical machines, mine works absolutely bad, the other is perfect. Picture on the left shows bad working reel, that on the right the good working. You can see how the second's one pin is recessed.
 

Attachments

  • IMG-20250719-WA0010.jpg
    IMG-20250719-WA0010.jpg
    181.9 KB · Views: 7
  • IMG-20250719-WA0009.jpg
    IMG-20250719-WA0009.jpg
    184.1 KB · Views: 8

Mac84

Administrator
Staff member
Founder
Sep 4, 2021
252
311
63
New Jersey, USA
www.mac84.net
Has anyone with a serial port been able to trigger a config dump? I managed to do it on my m127 machine with a reverse engineered config file, but haven't been able to since.

Since your machine differs than the ones in this thread, I suggest making another thread so your requests aren't buried under 25 pages of Kodak-related chat. :) Sadly, the underlying software or chipset don't seem to be the same - so I don't have any ideas.
 

0dan0

Tinkerer
Jan 13, 2025
134
200
43
New findings. I found the non-volatile memory for storing all the settings.

Non-volatile Type A
80E0B78C - Exposure 1-8 (+2.0 thru -2.0)
80E0B790 - Sharpness 1-8 (+2.0 thru -2.0)
80E0B794 - Tint 1-8 (+2.0 thru -2.0)
NVM more free 80E0B7A0+

Non-volatile Type B
80E0B87C - Exposure 1-8 (+2.0 thru -2.0)
80E0B880 - Sharpness 1-8 (+2.0 thru -2.0)
80E0B884 - Tint 1-8 (+2.0 thru -2.0)
NVM free 80E0B890-80E0B8fc (likely 80E0B800- 8ff is NVM)

Non-volatile Type C
80E0AD0C - Exposure 1-8 (+2.0 thru -2.0)
80E0AD10 - Sharpness 1-8 (+2.0 thru -2.0)
80E0AD14 - Tint 1-8 (+2.0 thru -2.0)
NVM free 80E0AD20-80E0AD8C

There are a significant number of byte free to use for new features.

I have also decoded how the bit-maps are stored. All 8-bit, some grey scale, some color look-up tables, all easily replaceable. More of the firmware image is just bit-maps, and JPEGs, very little code.

bitmaps are just <width><height><8-bit data of size ((width+3)&~3)*height> then repeats.


Why is any of this useful? I intend to replace the exposure bias (with my firmware does use) with a manual white balance control.
1753131931452.png


Part way there. The fonts used palette-based (indexed color). White text is 0xd6, black text is 0x3c, transparency is 0x0.
 
Last edited:

Mac84

Administrator
Staff member
Founder
Sep 4, 2021
252
311
63
New Jersey, USA
www.mac84.net
Super awesome find!! 👏

It might be too far fetched... but I remember when I learned how to dump the ROM I found similar chips that had more capacity with the same footprint. However, I assume that perhaps the firmware isn't designed to run with more space available and probably wouldn't function right.
 

KODIAK

New Tinkerer
Jul 20, 2025
3
4
3
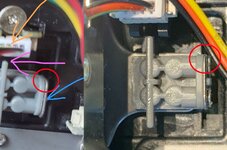
I decided to open the case and found that the position of the metal pin is strictly vinculated to a small bracket that acts on the (what I presume is) the position sensor. You can see those parts in the picture below and above on this same topic. Blue arrow is the base of the metal pin, purple is the bracket and orange is the sensor. No freedom to vary relative position between pin and braket. Do you know if there is any regulation screw under the grease or elsewhere? Thank you.

(grease over the cam got black because of intense use. Dozens of scans failed with this thing...)

IMG_20250719_151608.jpg
 

fishgee

New Tinkerer
Jan 6, 2025
18
7
3
I decided to open the case and found that the position of the metal pin is strictly vinculated to a small bracket that acts on the (what I presume is) the position sensor. You can see those parts in the picture below and above on this same topic. Blue arrow is the base of the metal pin, purple is the bracket and orange is the sensor. No freedom to vary relative position between pin and braket. Do you know if there is any regulation screw under the grease or elsewhere? Thank you.

(grease over the cam got black because of intense use. Dozens of scans failed with this thing...)

View attachment 22358
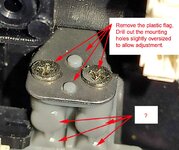
Kodiak - I hope I have an easy fix for you. It might be parallax in the photo, but your gray flag seems attached off center to the metal bracket. My flag is perfectly centered. I think moving the flag would also move the 'position' signal timing, and might fix your issue. Looked like 2 screws hold the flag in place. See attached picture.

Edit - I re-read your post and you said 'no freedom to vary the position' so maybe you tried this already. I see 4 more 'tubs' on the gray sensor. It would be madness to have 4 more screws holding the small flag for a total of 6. But I couldn't tell for sure. If you can't move the flag, then try moving the sensor itself closer and farther from the moving flag. You might have to get creative with a grinding tool if there is no wiggle room on the sensor mounting itself. Good luck.
 

Attachments

  • Kodak-sensor-flag.jpg
    Kodak-sensor-flag.jpg
    168.9 KB · Views: 4
Last edited: